 CLASHBASE.ONLINEFarming
About this Town Hall 11 base
Copy this base to Clash of Clans
Tap the button below. Clash of Clans will open so you can place this layout in an available base slot.
Copy base to the gameClash of Clans must be installed on this device.Rate this layout
Share a useful, honest experience. One review is stored per visitor for this item.
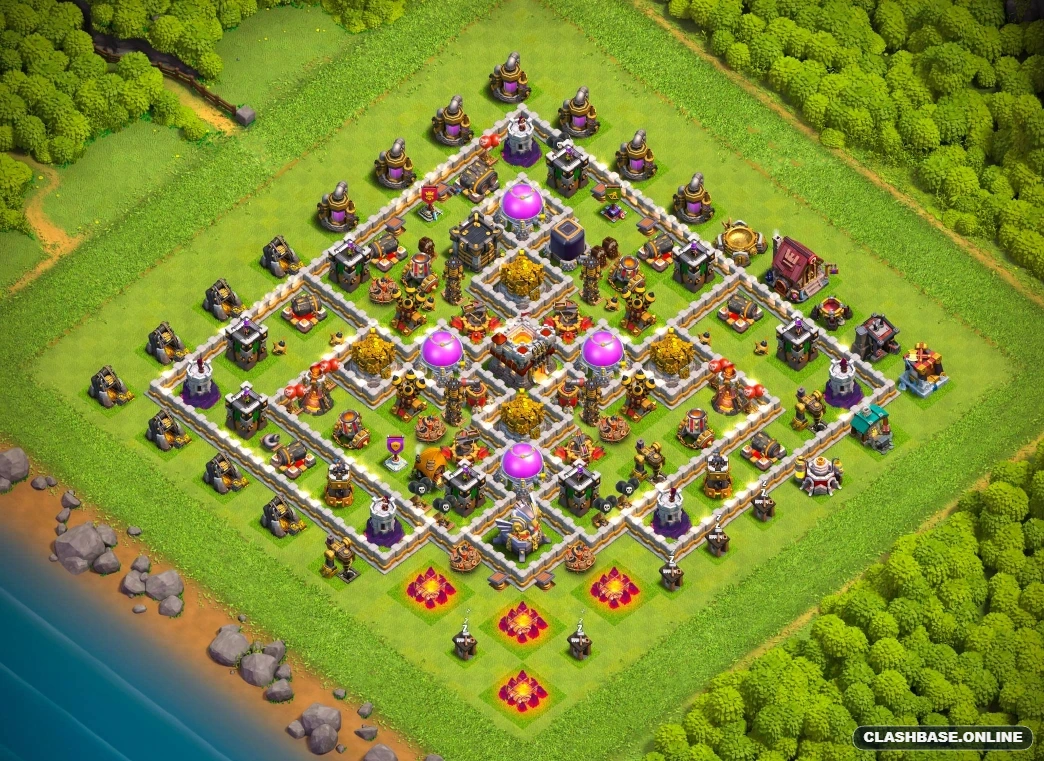
TH11 Farming Base #1: Layered-Square Defense Built for Resource Protection
TH11 Farming Layout #1 uses a layered-square structure with the Town Hall protected near the center behind the main storage line. Looking at the base itself, the design seems to prioritize something practical: keeping the valuable parts of the village from falling together.
The storages are spread through different compartments, while the Town Hall, Inferno Towers, Air Defenses, and other important defenses sit behind several wall transitions. A raider may get into one section, but that does not automatically provide a clean route through everything else.
Storages help slow the route into the core
The Gold and Elixir Storages are positioned around the deeper defensive area rather than grouped in one easy loot pocket.
That gives them a second job beyond holding resources. Their relatively high hit points can keep troops occupied while nearby defenses continue firing. Even if one storage eventually falls, those extra seconds may be enough to weaken the attacking army before it moves deeper.
For a farming base, that trade makes sense. Protecting every storage in every raid is unrealistic. Making the next storage noticeably harder to reach is a more practical objective.
Layered walls create repeated decisions
The square-within-square structure is probably the strongest part of Layout #1.
Opening one wall does not expose the entire core. Troops still need to cross another layer, change direction, or attack a different compartment before reaching the next valuable target.
That can create awkward pathing. A portion of the army may stay behind to clear one section while the main force moves inward. Once that happens, spell coverage becomes less efficient and the remaining defenses receive longer firing windows.
It is not a dramatic defensive trick, but over a full raid those small delays can add up.
Air Defenses and Infernos stay dangerous separately
The Air Defenses form staggered coverage around the core, while the Inferno Towers operate as separate high-value threats instead of one compact pair.
This means an attacker may have to decide which defensive section deserves attention first.
Queen Charge LavaLoon is a realistic threat if the Queen can remove the correct Air Defense and shape a good flight path. Hog or Miner Hybrid could also pressure the base when pathing is controlled carefully.
Electro Dragons may find useful chain damage in some of the tighter sections, although the village is not equally compact everywhere. Once they move between wider compartments, that advantage may decrease.
The right edge is the clearest weakness
The right edge appears to offer the easiest funnel.
The main danger is a disciplined corner entry that creates a relatively straight line through two wall layers. If the attacker opens that path cheaply, much of the layered-square depth becomes easier to bypass.
For the defense, this side ideally needs to cost something—hero health, spells, abilities, troops, or simply time—before the inner storages come under heavy pressure.
Why Layout #1 works for Farming
What makes TH11 Farming Base #1 useful is that resource protection appears to matter more than presenting one perfectly centered objective.
The Town Hall sits behind the storage line, valuable resources are divided between compartments, and staggered defensive coverage keeps multiple sections relevant throughout the attack.