 CLASHBASE.ONLINEClan War
About this Town Hall 12 base
Copy this base to Clash of Clans
Tap the button below. Clash of Clans will open so you can place this layout in an available base slot.
Copy base to the gameClash of Clans must be installed on this device.Rate this layout
Share a useful, honest experience. One review is stored per visitor for this item.
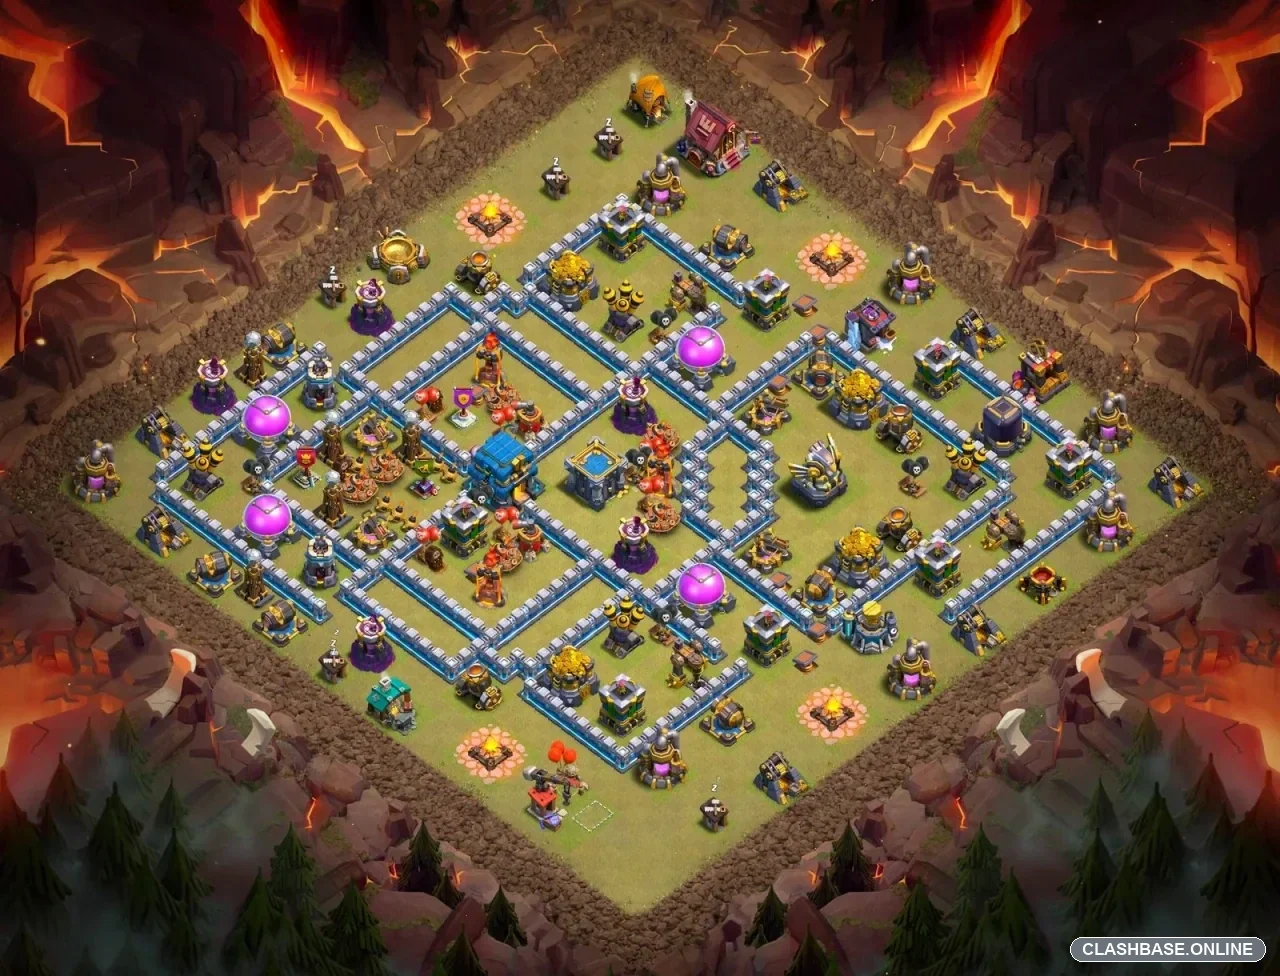
TH12 Clan War Base #1: Asymmetric Diamond Defense Built Around Split Defensive Value
TH12 Clan War Layout #1 uses an asymmetric diamond structure with the Town Hall positioned near the edge of the inner defensive core. Looking closely at the base, its defensive strength does not come from stacking every important building together. The Town Hall, Eagle Artillery, Inferno Towers, Air Defenses, X-Bows, and other high-value defenses are deliberately spread across different compartments.
That gives the layout a clear anti-three-star identity. One important section can fall while enough defensive power remains elsewhere to keep the rest of the village dangerous.
The Town Hall creates an isolated defensive objective
The Town Hall sits away from several other major defenses instead of sharing one tightly packed core with them.
From a defensive perspective, that separation matters. If the Town Hall compartment is eventually lost, the defense can still preserve the Eagle Artillery, Infernos, X-Bows, and other damaging structures in separate sections.
This prevents one successful phase of the raid from solving everything at once.
The Town Hall effectively works as a commitment point. The longer that section forces troops to remain under fire, the more useful the remaining defenses become later.
The asymmetric diamond disrupts predictable pathing
The wall structure is probably the most interesting part of Layout #1.
Its compartments are not perfectly mirrored, and different sections sit at noticeably different depths. That uneven geometry may cause troops to finish one compartment in an awkward position relative to the next.
This is useful defensively because the layout wants attacking troops to lose concentration as they move through the village.
A group that stays tightly packed can overwhelm defenses quickly. Once units spread between neighboring compartments, however, Infernos, X-Bows, Teslas, and surrounding towers gain more time to focus smaller groups.
The walls are therefore doing more than slowing movement—they are shaping where the defensive battles happen.
Air and Inferno coverage stays active in stages
The Air Defenses form staggered coverage around the core, while the Inferno Towers act as separate high-value anchors.
That spacing reduces the chance that several important threats can be suppressed from the same area.
If one defensive pocket begins to collapse, another can remain fully active farther across the village. Against air pressure, this helps keep multiple coverage lanes relevant. Ground-heavy pressure faces the same idea: removing one Inferno does not automatically neutralize the next important section.
This gives Layout #1 defensive endurance rather than one short burst of damage.
The left edge is the main structural concern
The left edge appears to be the side where the defensive shape has the least room to build overlapping pressure.
The concern is the shorter diagonal toward the inner structure. If this area collapses too quickly, the asymmetric diamond becomes easier to read and some of its pathing advantage disappears.
From a defensive standpoint, this side benefits heavily from hidden traps, overlapping fire, and anything that forces extra time or weakens troops before the central compartments are threatened.