
 CLASHBASE.ONLINE
About this Builder Hall 10 base
Copy this base to Clash of Clans
Tap the button below. Clash of Clans will open so you can place this layout in an available base slot.
Copy base to the gameClash of Clans must be installed on this device.Rate this layout
Share a useful, honest experience. One review is stored per visitor for this item.
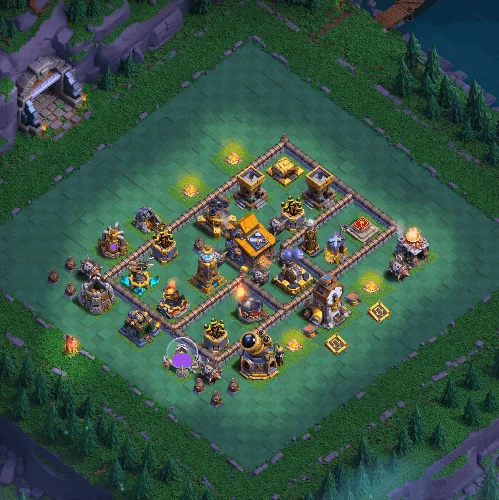
This Builder Hall 10 layout number 05 is fairly compact, but it avoids the perfectly symmetrical shape that often makes a Builder Base easier to read. The Builder Hall sits close to the middle of the main structure, with several defensive compartments wrapped around it. From a defensive point of view, the idea seems straightforward: make the attacker commit troops before they get a comfortable route into the core.
What I notice first is the wall arrangement. There is no single large compartment containing everything important. The upper section, central core, and right-side enclosure are separated enough to create awkward target choices for ground troops. That may not stop a carefully planned push, but it can punish an attack that simply drops Power P.E.K.K.A.s, Boxer Giants, or the Battle Machine from one side and expects them all to follow the same route.
The Builder Hall itself is not sitting alone behind a thick wall. Instead, its protection comes from the defenses surrounding the approach. Troops entering the center are likely to be under fire while they are still trying to break walls or switch targets. That is usually more useful than relying on walls alone, especially at BH10 where strong armies can get through isolated compartments fairly quickly.
There is also a noticeable amount of defensive pressure in the lower half. The Giant Cannon is positioned below the main core, where it can threaten ground troops moving across that side of the base. Other important defenses are tucked closer to the Builder Hall rather than being left on the perimeter. If an attacker sends a large group through the bottom, those units may end up compressed into a relatively small area while several defenses remain active.
The left and right sides are interesting as well. A number of buildings sit outside the main walls, which may look like easy percentage at first. They also have a practical defensive purpose: they can distort the funnel. One troop group might stay outside clearing a storage or defensive building while the main army turns inward. A few seconds later, what looked like one strong push has become two smaller ones.
Air armies do not appear to get a completely free side either. Air-focused defenses are spread around the structure rather than being stacked in one obvious corner. That should make it harder to remove all meaningful air pressure at the beginning of an attack, although a patient player may still find a favorable entry after studying the layout.
The main weakness is probably the same thing that gives this base much of its strength: the compact core. If an attacker funnels correctly and reaches the middle with most of the army intact, several important targets become available in a short distance. Strong ability timing can reduce some of the pathing problems the design is trying to create.
Still, this BH10 layout appears defensively well balanced. It relies on troop splitting, overlapping damage, wall-induced pathing, and awkward cleanup rather than one gimmick. I would expect it to perform best against rushed attacks where the player commits heavily from one direction without first controlling the exterior buildings. As always, actual defensive results will depend on building levels, trap settings, troop levels, and the quality of the attack.
 CLASHBASE.ONLINE
 CLASHBASE.ONLINE
 CLASHBASE.ONLINE