
 CLASHBASE.ONLINE
About this Builder Hall 10 base
Copy this base to Clash of Clans
Tap the button below. Clash of Clans will open so you can place this layout in an available base slot.
Copy base to the gameClash of Clans must be installed on this device.Rate this layout
Share a useful, honest experience. One review is stored per visitor for this item.
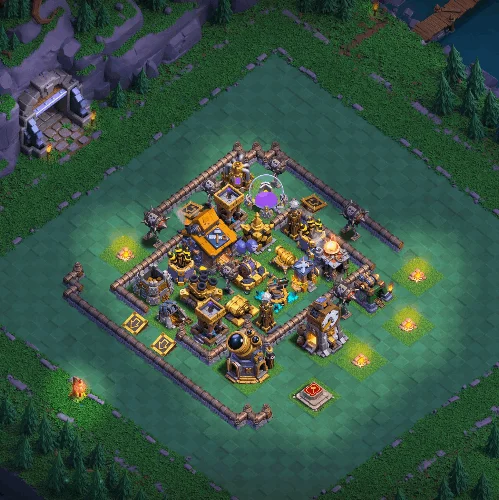
This Builder Hall 10 base number 08 uses a compact defensive core, but it does not feel completely symmetrical or predictable. The Builder Hall sits slightly toward the upper-left portion of the defended area, while several of the stronger defenses are concentrated beneath and beside it. That offset placement appears intentional: the attacker can see a route toward the Hall, but choosing that route may leave other important defenses active for longer.
One of the first things I notice is the uneven wall structure. The walls do not create a perfectly closed square. Some sections extend outward, while other areas are more open. On paper that can look less secure, yet it may actually help with troop pathing. Ground units approaching from the left or bottom can be pulled toward nearby buildings instead of moving cleanly into the Builder Hall compartment.
The Builder Hall itself benefits from the amount of defensive activity surrounding it. It is not protected simply by stacking walls around it. Instead, troops that enter the central area are likely to face several defenses at roughly the same time. The Multi Mortar and other core defenses can keep applying pressure while tanks are busy targeting something else, making an unorganized push much less comfortable.
The Giant Cannon near the lower side is particularly useful here. Its position gives it a good lane across part of the base and may punish groups of ground troops that enter together. If Boxer Giants, Power P.E.K.K.A.s, or the Battle Machine line up badly, one defensive shot can create more trouble than the attacker expected.
There is also strong pressure from the right-hand side. Several defenses are placed close enough to support the core without being directly on top of the Builder Hall. I like that separation because destroying the Hall does not automatically switch off the most dangerous part of the layout. Surviving troops still have work to do.
The outside buildings play a role too. Structures sitting beyond the tight defensive cluster can interfere with a careless funnel. A troop that turns toward an exterior building may look harmless at first, but that small split can leave the main group entering the core with less support. It also creates a little extra cleanup pressure near the end of the attack.
The main compromise is the density of the center. If an experienced player creates a clean funnel and gets a strong group into the middle with abilities still available, several important defenses are close enough to be removed fairly quickly. The layout therefore seems more dependent on disrupting the approach than on surviving indefinitely once the center is fully breached.
Overall, this BH10 design appears strongest at forcing awkward troop movement, concentrating damage around the core, and keeping multiple defenses relevant during the Builder Hall push. It should be particularly uncomfortable for rushed attacks where most troops are dropped from one side without controlling the exterior first. Actual defensive results will still depend on building levels, trap settings, troop levels, and how carefully the attacker executes the plan.
 CLASHBASE.ONLINE
 CLASHBASE.ONLINE
 CLASHBASE.ONLINE