
 CLASHBASE.ONLINE
About this Builder Hall 5 base
Copy this base to Clash of Clans
Tap the button below. Clash of Clans will open so you can place this layout in an available base slot.
Copy base to the gameClash of Clans must be installed on this device.Rate this layout
Share a useful, honest experience. One review is stored per visitor for this item.
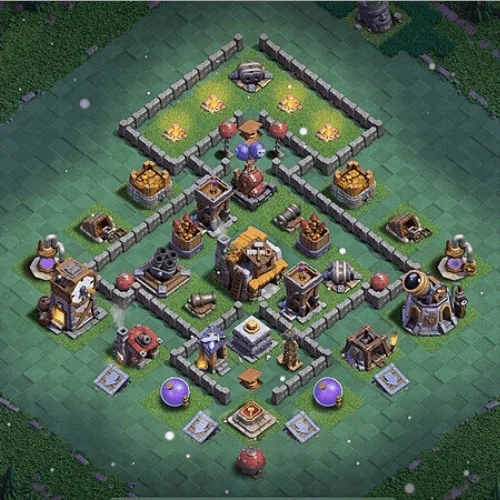
The most distinctive part of this Builder Hall 5 base number 04 is not the center—it is the long northern section. A wide wall enclosure extends away from the main village and narrows into a small channel before reaching the core. That gives the defense a very different feel from a standard compact BH5 setup. Instead of simply asking attackers to break walls, it appears designed to influence where their troops travel and how long they spend getting there.
The Crusher at the northern end is an especially interesting choice. It sits inside a large compartment with plenty of empty ground around it, while the wall opening above creates what looks like a tempting approach. Ground troops entering from that direction may be drawn deeper into the section rather than immediately reaching the Builder Hall. Even if the Crusher is eventually removed, the attacker has spent time and troop movement away from the main objective.
Just below that area, the narrow connection into the village looks deliberately uncomfortable. There are visible traps around the route, and the tighter spacing means troops have fewer clean ways to spread out. A group that arrives together may stay grouped together, which can make splash damage and concentrated defensive fire more effective. It is a small detail, but probably one of the reasons a careless northern deployment could go wrong quickly.
The Builder Hall is kept in the lower half of the central compartment, with several defenses positioned around it. The Multi Mortar sits nearby on the left, while Archer Towers, Cannons and other weapons cover different sides of the core. This creates a situation where reaching the Builder Hall does not automatically mean the hard part is over. Troops can still be taking fire from several angles while they are trying to finish it.
Air coverage has also been kept away from only one location. The Air Bombs on the right side are separated from the Builder Hall and the Multi Mortar, so an attacker cannot remove all of the base's important defensive value by clearing one small pocket. That separation may be useful against flying troops, especially when part of the army gets distracted by exterior buildings.
There is a quieter defensive benefit in the structures placed outside the walls. Buildings on both flanks and near the bottom can interfere with funneling. Drop troops too wide and some may wander away from the core; ignore those structures completely and they can become late cleanup targets. Neither outcome is disastrous by itself, but both can eat into the attack timer.
The trade-off is that the lower central area is fairly compact. A player who avoids the northern funnel, clears the side buildings correctly and reaches the core with a healthy group could take down several important defenses in quick succession. So the base is likely to perform better when its pathing tricks work early rather than relying on raw defensive strength at the end.
For BH5, this is a thoughtful defensive concept. The long northern bait area, narrow transition into the core, protected Builder Hall and spread-out defensive coverage all seem aimed at one thing: making the attacker spend troops and seconds in the wrong places. It may not stop every well-planned attack, but rushed deployments are likely to find this base much more awkward than it first appears.
 CLASHBASE.ONLINE
 CLASHBASE.ONLINE
 CLASHBASE.ONLINE