
 CLASHBASE.ONLINE
About this Builder Hall 7 base
Copy this base to Clash of Clans
Tap the button below. Clash of Clans will open so you can place this layout in an available base slot.
Copy base to the gameClash of Clans must be installed on this device.Rate this layout
Share a useful, honest experience. One review is stored per visitor for this item.
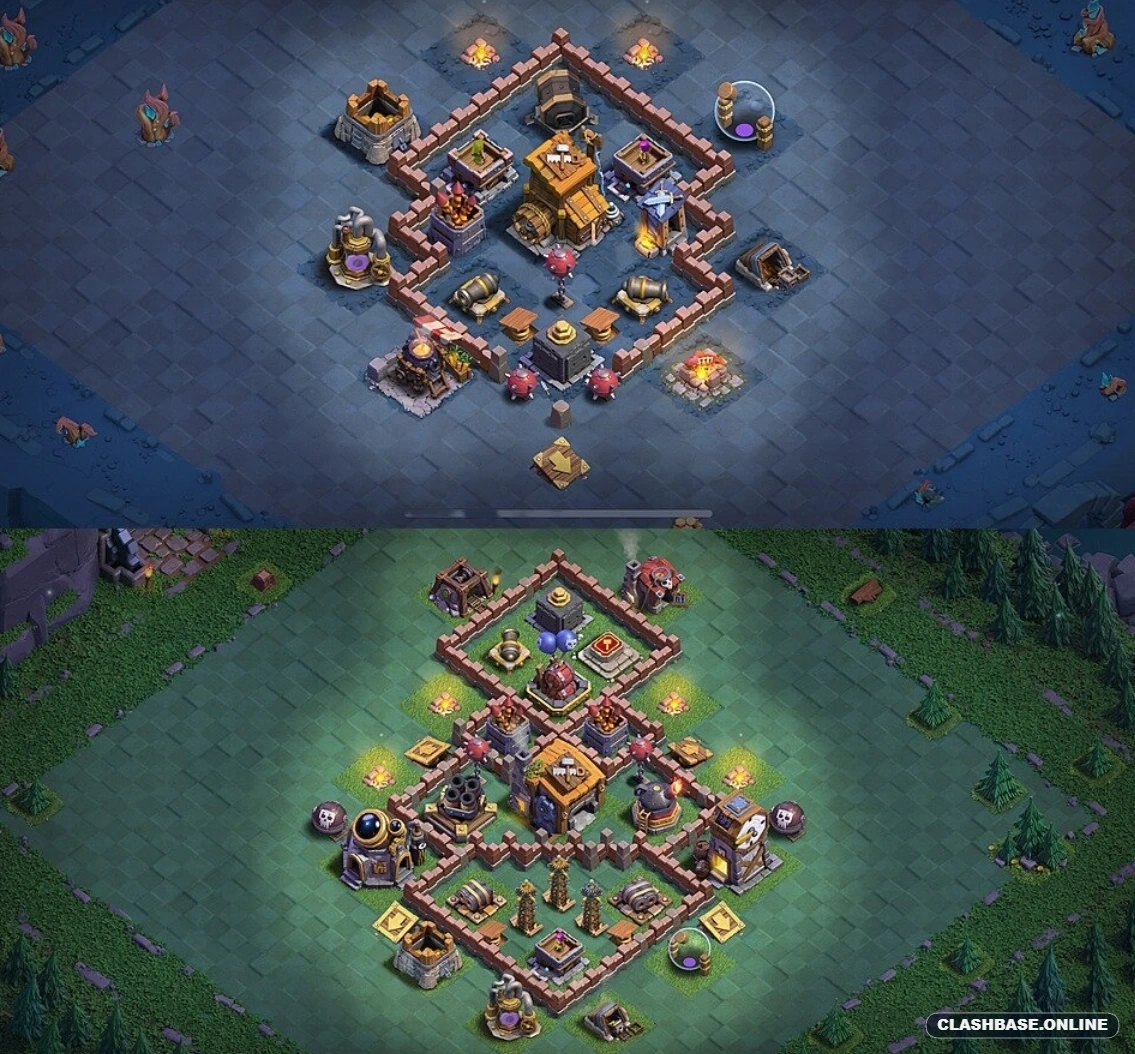
There’s something slightly deceptive about this Builder Hall 7 number 01 setup. From a distance, the base looks fairly open because the walls stretch vertically instead of forming one big compact square. Once you follow the likely troop routes, though, the idea becomes clearer: most attacks are gradually pushed toward a much tighter middle section where the heavier defenses can work together.
The Builder Hall is positioned almost at the center, with the Multi Mortar sitting close on the left and another major defensive threat covering the right side. That creates a difficult little pocket around the Hall. An attacker who decides to rush the center may reach the main objective quickly, but those troops are also walking into an area where several defenses can overlap their fire.
What I find more interesting is the separation between the top, middle and bottom sections. The upper compartment contains relatively few buildings, yet it still forces troops to spend time crossing walls and changing targets. If an army starts from that direction, it may clear the first section without much trouble, only to arrive at the Builder Hall area already spread out. That is probably where the layout gets most of its defensive value.
The lower section works differently. Its walls form a wider pocket, with several defenses and small structures positioned across the lane. Ground troops entering here may not travel straight toward the Hall. One group can be pulled left, another can move right, and support troops may take a different route from the units intended to tank damage. At BH7, that kind of separation can hurt an attack surprisingly quickly.
The Multi Mortar’s central-left position is useful because it is not sitting on the perimeter waiting to be removed. It can keep firing while troops deal with other targets, especially when several units remain grouped together. The Air Bombs on the left side also add an early threat for flying armies. Air attackers can avoid that side, of course, but doing so changes their entry angle and may leave other defensive buildings active for longer.
There is also a decent amount of empty space around the outer edges. That may look wasteful, but it can complicate deployment. Troops placed too wide have more distance to travel before joining the main fight, while outside buildings can pull some units away from the intended route. A few seconds of wandering is sometimes enough to break the timing of an otherwise organized attack.
This base does have a noticeable trade-off. Several important defenses are close to the Builder Hall. If an attacker creates a clean funnel and reaches that central pocket with a healthy force, the defense could lose multiple key buildings fairly quickly. The narrow middle is effective when troops arrive in pieces, but less impressive when the attacker manages to keep everything together.
That makes this BH7 design feel less like a brute-force wall setup and more like a pathing trap built around troop separation and concentrated central fire. Its defensive quality depends on making the approach awkward. When the attacker’s route becomes messy, the core has a good chance to capitalize on it.
 CLASHBASE.ONLINE
 CLASHBASE.ONLINE
 CLASHBASE.ONLINE