
 CLASHBASE.ONLINE
About this Builder Hall 9 base
Copy this base to Clash of Clans
Tap the button below. Clash of Clans will open so you can place this layout in an available base slot.
Copy base to the gameClash of Clans must be installed on this device.Rate this layout
Share a useful, honest experience. One review is stored per visitor for this item.
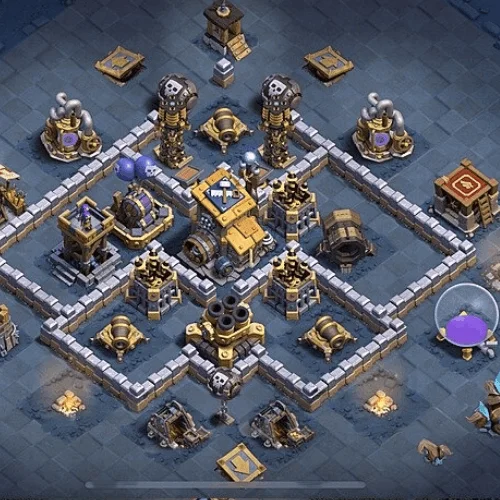
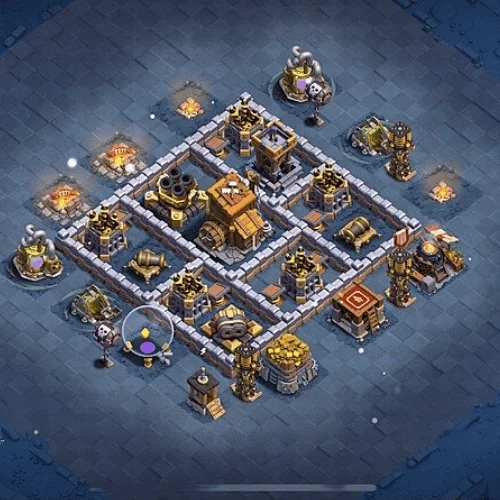
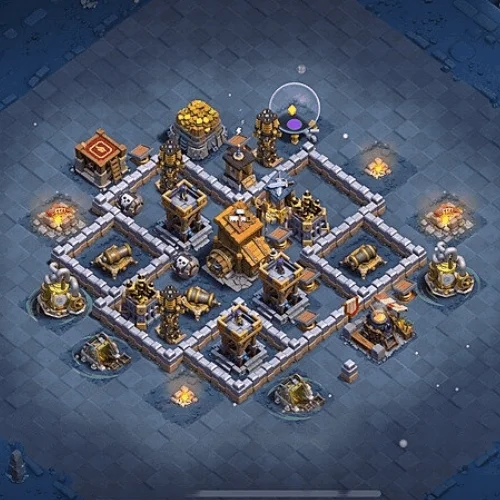
There is a clear defensive idea behind this BH9 number 06 setup: make the attacker work through several small zones instead of giving them one clean route through the village. The central objective sits below the middle of the base, while the surrounding walls form a mix of narrow compartments, short corridors, and offset defensive positions.
That structure could be especially troublesome for ground armies.
A push coming through the upper side, for example, does not immediately get access to everything valuable. Troops have nearby defenses on both the left and right, so targeting can become messy once the first wall is broken. A Battle Machine may drift toward one building while heavier troops continue elsewhere. When the attacking group stops moving as a single unit, the defenses naturally get more time to fire.
The Giant Cannon positioned toward the upper-right adds another layer to that problem. It sits far enough from the central objective that attackers cannot remove both areas with the same early push. Ground troops crossing its line of fire may take pressure while they are already distracted by walls and closer targets.
The Multi Mortar also benefits from being placed deeper inside the structure. Rather than sitting on the perimeter and disappearing early, it can continue applying splash damage while other buildings absorb the first part of the attack. Against tightly grouped troops, that sustained pressure may become more valuable than a single high-damage defense.
What makes this base interesting, though, is not one particular building. It is the way the compartments interact.
The upper wall extensions create awkward entry lanes. The middle section keeps several defenses close enough to support each other. Lower walls then slow down troops that approach from the opposite direction. An attacker has several possible openings, but none appears to give a completely straight path through every important target.
There are also buildings positioned beyond the main defensive walls. They offer relatively easy destruction percentage, yet they can interfere with troop placement. Deploy too wide and a few units may stay outside longer than planned. Ignore those buildings, and surviving troops could be forced to travel back for cleanup later.
The design is not without risk. Once a well-organized army reaches the center with most of its strength intact, the compact spacing means several defenses become reachable in quick succession. Air-based strategies can also ignore much of the wall geometry, reducing one of the base's main advantages.
Even so, the defensive logic is sensible. The base tries to create poor angles, divided troop movement, sustained splash damage, and crossfire around the central area. It is likely to be more effective against impatient attacks than against players who carefully clear the edges and plan their entry before committing the main force.
 CLASHBASE.ONLINE
 CLASHBASE.ONLINE
 CLASHBASE.ONLINE