
 CLASHBASE.ONLINE
About this Builder Hall 10 base
Copy this base to Clash of Clans
Tap the button below. Clash of Clans will open so you can place this layout in an available base slot.
Copy base to the gameClash of Clans must be installed on this device.Rate this layout
Share a useful, honest experience. One review is stored per visitor for this item.
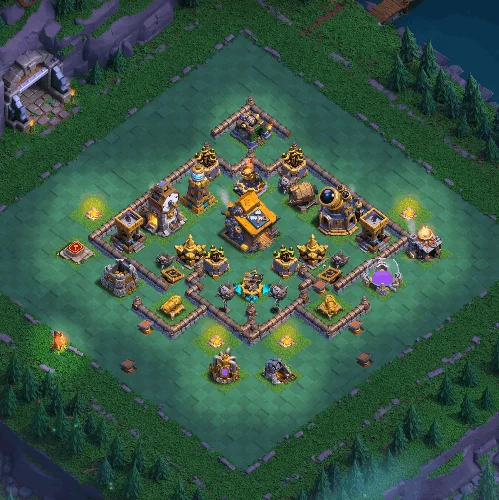
This Builder Hall 10 layout number 07 takes a different approach from the heavily compartmentalized bases you often see. Most of the important buildings sit inside one large diamond-shaped perimeter, so the defense is not really trying to win through wall depth. Instead, it appears to rely on spacing, overlapping fire, and making troop movement less predictable once the attacker crosses the outer wall.
The Builder Hall sits slightly above the center, which is a useful position defensively. It is not tucked into an obvious corner, but it is also not the first building attackers can comfortably reach from every direction. A push from the top has a shorter route toward the Hall, while entries from the bottom or sides expose troops to a much larger portion of the defensive network first.
What stands out to me is how the stronger defenses are spread around the Builder Hall rather than stacked directly beside it. The tall central defense below the Hall creates pressure through the middle, while the Giant Cannon in the lower-right section threatens ground armies crossing that part of the base. Several smaller defenses cover the gaps between them. Because of that, breaking through the wall is only the beginning; troops can still be taking fire from different angles while choosing their next target.
The open interior is interesting too. At first, it might look easier to attack because there are fewer internal walls. That is only partly true. More open space means troops have several buildings within targeting range, and their route may change depending on which structure is closest. A Power P.E.K.K.A. or Battle Machine that turns sideways for a nearby defense can leave the rest of the army entering the core without its main tank.
The outer buildings on the left and right sides also have a quiet defensive role. They can pull troops away from the diamond if the funnel is poorly prepared. That matters more than it sounds. Losing even one or two units to outside cleanup can reduce the strength of the group that eventually reaches the Builder Hall.
Another positive feature is the spacing between major targets. The defenses are compact enough to support each other, but they are not all sitting on exactly the same tiles. This may reduce the value an attacker gets from concentrated area damage or a single well-timed ability.
There is still a clear trade-off. Once a strong army gets fully inside the perimeter, there are fewer walls available to slow it down. A disciplined attacker who creates the funnel first and enters with most troops together could move through the central area quite quickly.
Overall, this BH10 layout seems designed to punish poor pathing and rushed deployment rather than simply stall troops behind walls. The diamond perimeter, protected Builder Hall, central defensive pressure, Giant Cannon coverage, and exterior distractions work together reasonably well. Its defensive quality should be strongest against attacks that enter from one side without first controlling the surrounding buildings, while experienced attackers will likely focus on creating a clean funnel before committing their main force.
 CLASHBASE.ONLINE
 CLASHBASE.ONLINE
 CLASHBASE.ONLINE