
 CLASHBASE.ONLINE
About this Builder Hall 5 base
Copy this base to Clash of Clans
Tap the button below. Clash of Clans will open so you can place this layout in an available base slot.
Copy base to the gameClash of Clans must be installed on this device.Rate this layout
Share a useful, honest experience. One review is stored per visitor for this item.
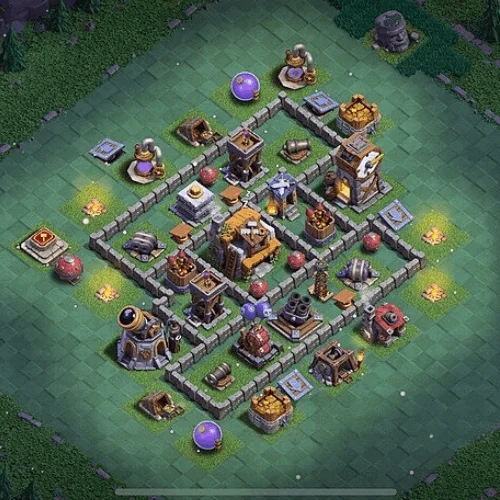
There’s quite a lot packed into a small area here, and that seems to be the main idea behind this Builder Hall 5 base number 03. Instead of stretching the defenses across the whole map, the layout keeps most of the dangerous buildings close to the Builder Hall while using the outer structures to interfere with troop movement. It feels more like a pressure base than a pure time-wasting design.
The Builder Hall sits inside the central wall network, where an attacker has to work through other targets before getting a comfortable shot at it. That position is important because the center is not protected by one defense alone. Cannons, Archer Towers and other nearby weapons can keep firing as troops work their way inward. Even if the first wall goes down quickly, the attack still has to survive the damage waiting behind it.
I also like how the walls are split into several short compartments rather than forming one oversized enclosure. Ground troops can enter one section and then find themselves redirected toward a side building instead of immediately moving onto the Builder Hall. It may only cost a few seconds, but at BH5 those seconds add up surprisingly fast. A Battle Machine that spends too long hitting something off to the side can leave the rest of the army exposed in the center.
The Multi Mortar positioned toward the lower-left area adds useful pressure from behind the first defensive line. Because it is not sitting directly on the easiest edge, it has a reasonable chance to survive the opening part of an attack. That gives it time to fire repeated volleys into clustered ground troops. Large groups of Barbarians can look healthy when they first enter, then suddenly lose numbers once several defenses start hitting them together.
Another strength is the way defensive coverage comes from different angles. The base does not seem to depend on one obvious “strong side.” Attacking from the bottom, for example, still leads into a group of defenses, while approaching from the top means dealing with exterior buildings before reaching the more valuable targets. That makes choosing an entry point slightly less obvious than it would be on a simple square base.
A few buildings are deliberately left beyond the main walls as well. Those structures can act as distractions and, later in the battle, become awkward cleanup targets. An attacker who ignores them may have to send surviving troops back across the base. Someone who clears them early, on the other hand, is spending troop time before the real push even begins.
The layout does have a weakness. Its central section is fairly dense, so a well-funneled army that reaches the middle in good shape could start removing several important buildings quickly. Once that happens, the compact design may lose defensive power faster than a more spread-out base. Careful attackers will probably try to avoid being pulled into the side compartments and instead create a direct route toward the core.
Still, for Builder Hall 5, the defensive concept makes sense. The base combines central protection, short compartments, overlapping fire and distracting outer targets to make straightforward attacks less efficient. It is unlikely to stop every experienced player, but it should punish rushed deployment and make opponents think about pathing instead of simply dropping an army from one edge.
 CLASHBASE.ONLINE
 CLASHBASE.ONLINE
 CLASHBASE.ONLINE